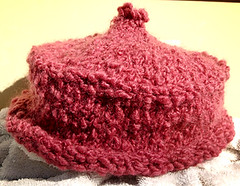
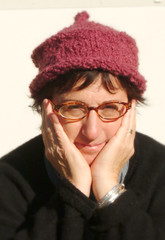
 I am enjoying this little hat. Late last night, my cousin popped in on her way from NY to Newport. She said "ooh, nice hat, that is so in style right now" When Melanie says things like this, I perk right up - she's not only much younger than I but she grew up in France and has that je ne sais quoi thing. Not that style reveals itself here, as I squint into the sun with a still- damp-from-blocking hat on my head.
Since Libby asked, the pattern follows. Writing it up makes me truly appreciate the talents of designers who write patterns well. Which is a nice way of saying.....well, proceed with caution on mine.
• • • • • • • • • • • • • •
Cirque Du Suess Hat
fits women size medium
yarn: bulky weight wool with a bumpy texture works well , guesstimating 100 yards
(mine was some mystery wool given to me long ago, no info on it)
needles: size 8 dpns , size 8 circular , 16 or 24"
note: you're using needles 2 sizes smaller than what you'd think for the weight yarn, so you get a nice dense fabric that'll hold the shape.
The hat is knit top down.
Forming the top flume:
On one dpn, cast on 7 stitches. Do not join. Knit first three stitches onto a 2nd dpn. Knit next 3 stitches onto a 3rd dpn. Knit last 2 stitches onto the 4th dpn. Now join the round. Knit one round even. If you wish to exaggerate the flume on top, you can knit another ,or many more, rounds even now.
The top of the hat: On next round, increase 6 stitches evenly spaced. I do this by knitting into the front and back of a stitch, with nubbly yarn its a hidden increase. If you use yarn with better stitch definition, a lifted increase might be a better choice. Knit next round even. Place marker to keep track of beginning of rounds.
On next round, increase 7 stitches evenly spaced. Knit next round even.
On next round* Increase 8 stitches evenly spaced on the round. Knit next round even.* Repeat from * until the radius of the hat from the center flume is about 5 inches when flattened. This is somewhere around 70 stitches but will depend on your yarn and gauge. If you wish a larger hat, now is the time to keep increasing the top diameter.
Turning the corner: Purl next round. Purl second round , this time onto the circular needle. This may be unnecessary but its easier to handle. These purl rows put you over the corner of the hat, you're now knitting the sides that come down.
Sides: Knit even for 4 inches or as long as you like it. Bind off in knit, creating a roll brim. Weave in ends. Give it a quick soak and let dry standing up with some towels in it to keep the shape.
• • • • • • • • • • • • • •
If you try this pattern , let me know how it comes out!
If you try this pattern , let me know how it comes out!
I have another hat I came up with this weekend, its tale and pattern, too. I know, what was in the drinking water? I'll save it for a day or so. Meanwhile, if you want good gift ideas, hit Susan's treasure of a list, gifts to knit with 1-3 skeins. She should win a Public Service to Knitters award for linking all these, yeah, that's the unfortunately named PeSKy.
WOO! I'm off to my LYS! :D
ReplyDeleteHoly, moley! I just worked out a top-down hat pattern this weekend because I was short on some hand-dyed yarn and wanted to make sure I had enough to finish. I'm posting it on my blog this week. Yours is cute. ;-)
ReplyDeleteI love it!
ReplyDeleteWhat a great hat. Thanks for sharing your pattern.
ReplyDeleteI LOVe that hat! It is super cool. I am opening the big trunk of stash yarn to see if I have any approprite yarn. Thanks for the pattern.
ReplyDeleteHello,
ReplyDeleteJust thought I'd let you know I'm almost finished making your hat. It's looking rather different since I needed about 120 stitches to get it up to 10" across, so I suppose the yarn is much finer. I've alse made some decreases after the turn, so it's more like a beret, really.
Will be doing the roll edge in a contrast, probably bamboo. The yarn for the body is recycled, and I'm really pleased with the effect.
Thank you! Photos to come shortly. :)
I love the look of this hat, and how the little peak just sticks right up like a circus tent. It also looks like it wouldn't squash your hair. I want to make one!
ReplyDelete